We have a new employee in our company, who starts his work as junior System Engineer. However, as a junior there are still many things to learn and I am also responsible to show him some things from the Microsoft Exchange and Office 365 world. Honestly saying, I like the new Guy, he is motivated and he asks questions about things he don’t know.
From my point of view this two skills (being motivated and not being scared to ask questions) are a good for start and to become a good Engineer in the future.
Some days ago, he asked me how to assign licenses to users in Office 365. To show that was not a big deal. However, in the evening by driving home from work, I came to the idea to write a short article about that. Not just how to enable a license for one user, also different ways how this can be done for multiple or by using other ways like PowerShell.
Assign license for one user, using Office 365 admin center
After logging in to the Office 365 admin center, we browse to Users > Active users and here we search for the user, we want to assign a license.
In the tab Product licenses we chose the option Edit.
As we can see in the picture below, (and depends about our subscriptions). We simply switch the toggle to On position for the license that we want to assign to this user.
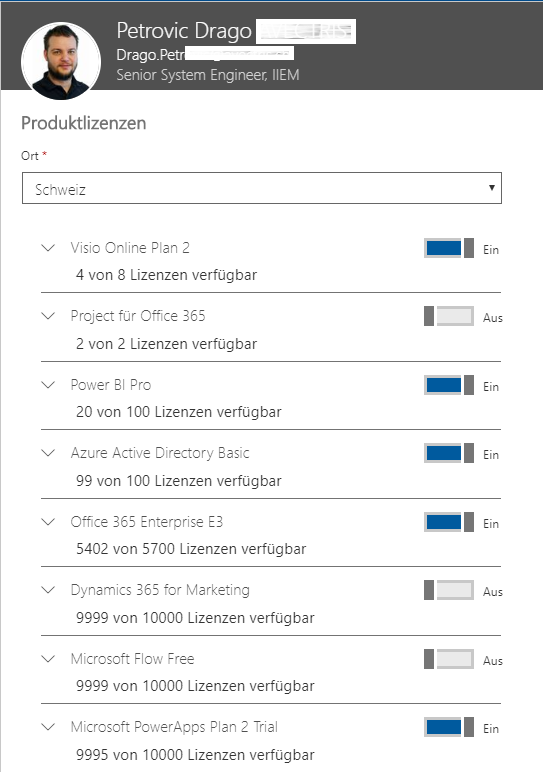
Note: By default, all services associated with that license are automatically assigned to the user. To limit services, which are available to the user, switch the toggles to the Off position for the services that you don’t want that user has.
To finish this operation of assigning the license we need to scroll down to the bottom of the Product license pane and there we have to choose Save. If everything is fine this will be successful, and we can close the window. If we get an error here, we can check two points:
- Are there enough licenses available?
- Do we have set the user Location on the top?
Assign license for multiple users
For assigning license to multiple users we can follow the steps like by a single user. However, there is just a little difference to the steps by a single user…
First, we need to log-in to our Office 365 admin center, after that we browse to Users > Active users and here we search for all the users, we want to assign a license.
After selecting at least, a second user, we get a new popup window on the right site of our web browser, which is called Bulk actions.
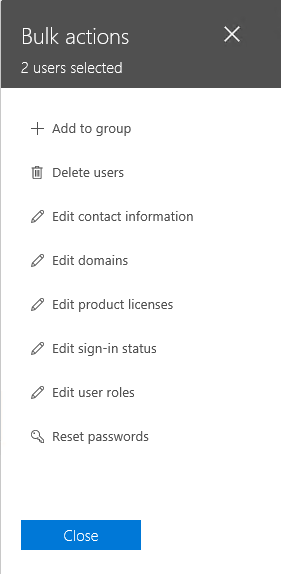
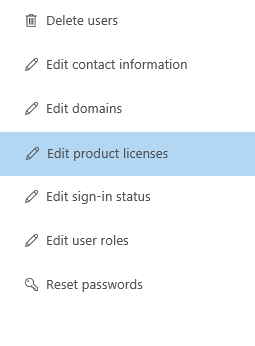
As we can see, here we have now multiple options to continue our work. In our scenario we want to assign an Office 365 license to multiple users, in this case we need now to choose the option Edit product licenses.
Now we can assign the necessary licenses to the selected users.
Enable license using PowerShell
Another way to assign licenses to the users in our company is with using PowerShell.
The first thing we have to do is to connect to our Office 365 Tenant by using PowerShell. To do that, we need following commands:
$UserCredential = Get-Credential
Connect-MsolService -Credential $UserCredential
Note: if you haven’t installed the MSOnline Module, you can do that by running your PowerShell with Administrative rights and hitting the following cmdlet:
Install-Module MSOnline
To be able to assign licenses by PowerShell, we need now to know the User Principal Name (UPN) of the user we want to assign the license. However, as well we need to know which license we want to assign. For an easier understanding you can have a look on the following example:
Set-MsolUserLicense –UserPrincipalName [email protected] –AddLicenses “contoso:ENTERPRISEPACK”
So, how to know how the licenses are called in the PowerShell and how to find out how many freelicenses we still have? This we can figure out easily by using the following command:
Get-MsolAccountSku
Here is an example, how the output could look like:
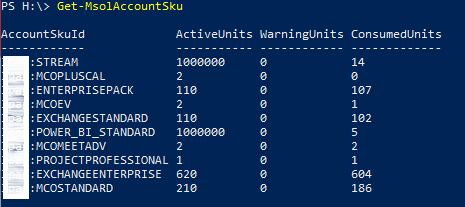
Here we see the exact name and a number of Active and Consumed Units.
To get a list of all our users which has no license assigned, we can hit this command:
Get-MsolUser –All –UnlicensedUserOnly
This command can help us for assigning licenses for multiple users. As example the command could look like this:
Get-MsolUser -All -UnlicensedUsersOnly; $AllUn | foreach {Set-MsolUserLicense -AddLicenses "contoso:ENTERPRISEPACK"}
If we don’t want to do that for the whole company, we also can do it for departments, then the command could look like this:
Get-MsolUser -All -Department "Sales" -UsageLocation "CH" -UnlicensedUsersOnly; $Sales | foreach {Set-MsolUserLicense -AddLicenses "contoso:ENTERPRISEPACK"}
What we need to know about assigning licenses to users in Office 365
There are some things which are good to know about assigning licenses to our users:
- We need to be either a Global administrator or at least a User management administrator in our Office 365 Tenant.
- Some services, like Sway, are automatically assigned to users, and don’t need to be assigned individually.
Conclusion
In German we have an expression: “Viele Wege führen nach Rom”. That means, there are many ways how we can make sure that the users from our company has the right license assigned. The most common ones I have just showed here in this article. However, there are other ways as well. Just one of the examples: We can create Azure Active Directory groups-based licensing where we can add our users and then the licenses will be assigned automatically. If you are interested in this, I can recommend you the official Microsoft doc following the Link HERE.
I guess the most of you knew at least one of the options I have shown in this article, from my point of view we need to take time and support our motivated junior Engineers by helping them going very first steps in the Office 365 and Azure world.
🙂
Photo by Steve Johnson on Unsplash